when constructing our thriller I have learnt so much about technology. Firstly before we began with anything practical we was asked to set up our blogger users. Blogger is a really simple website that I thought was really easy to use. With this website you're able to upload: Images, Videos and blog about them, In other words you can talk about them and share information with everyone else on blogger.
The website is www.blogger.com when you have reached the homepage you can sign in by typing in your email and password.
To upload a new post...on the the top right hand corner of the page you should find the 'NEW POST' icon, looks like this :

To change the style of the font, size of font, colour, add a text background, a link, upload images, videos and a lot more.....you'll find them all here:

So after learning how to use blogger, came the production of our preliminary films. This meant that we had to learn to use the JVC digital tapeless cameras. Along with this came the tripod, our memory
cards, memory card adapter and the hard drive that we used throught creating all our films; the preliminary's and the final cut.
The camera was the most important equipment. As without it no filming could take place. Whilst filming your able to see through the small lens or you could open up the flap on the side of the camera which is a screen that enables you to view your progression whilst filming.
The tripod allows you to have a still camera shot instead of holding it and filming which will be too shaky. However, the legs of the tripod must be open equally otherwise it wont be stable. Also when zooming into something instead of carrying the camera and zooming, Its better if you situate the camera on the tripod and use the zoom. As this will allow the image to be clear and not shaky.
Okay, so once you've finished filming you'll need to get all your shots onto the computer. In our case, we were using the Apple Macs to edit. So, we used the usb adapter and inserted our memory card into it then put it into the usb slot. As we were given a hard drive that we can store everything in, we had to move everything from the memory card to the hard drive.
Once you've done all that, you can now open up final cut pro. Final cut pro is a software that allows you to put your film in order. you can delete shots and keep the ones you want. so to get your film from the hardrive onto final cut pro, you go to ....
 |
| final cut pro icon at the bottom of the screen |
|
|
|
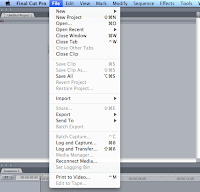
Then final cut pro will open up, you'll need to open up your project by going on.....
 |
| File - Open |
|
 |
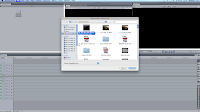
| select your project and then click on CHOOSE |
|
|
| ,which is on the bottom right hand corner of the tab. |
| | | | | | | | | | | | | |
|
Once it has opened up, you can now start moving around your shots and placing them where you'd want them to be. Once your happy with how it looks you might want to add titles. This is when Livetype comes in. So, live type looks like this....
 |
| Livetype Icon, at the bottom of the screen |
just like final cut pro you'll have to open up your project.
you'll then see a selection of things you can add onto your film on the right hand side of the page.
 | | | | | | | | | | | | | | | | | | | | | | | | | | | | | | | | | | | | | | | | | | | | | | | | | | | | | | | | | | | | | | | | | | | | | | | | | | | | | | | | | | | | | | | | | | | | | | | | | | | | | | | | | | | | | | | | | | | | | | |
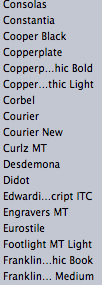
| As you can see, there are two kind of fonts that livetype provide and the casual fonts that are used everywhere. You choose! |
|
|
|
|
|
|
|
|
|
|
|
|
|
|
|
|
|
|
|
|
|
|
|
|
 |
| Serif and non serif fonts. A selection you can choose from. and many more. |
|
|
|
Once your happy with how it looks you just go on file- save. Then you'll need to use another software, SoundTrack Pro. This software allows you to add sound to your film. Sound is vital as it brings everything together.
So, its this Icon:
 |
| Sound track pro. Bottom of screen. |
|
|
for soundtrack pro, you follow the same steps as livetype and final cut pro to open up your film. there are a selection of sounds you can choose. you just select the sound and drag it onto the time line. once your happy save and render it so you'll have one whole clip.
From creating my final piece I've learnt a lot about technology. As I have learnt to use many new software's and Ive learnt to use the camera.
By Wala Osman


